This section of the exam makes up 38% of the overall exam, ~22 questions and tests these topics:
• Configuring Business units, permissions, and security
• Configuring integrations
• Marketing Cloud extension products
• Setup features
https://trailhead.salesforce.com/content/learn/modules/marketing-cloud-setup
SetUp Home
Marketing Cloud Setup provides a centralized location to view and manage details about your Marketing Cloud account. Setup also contains links to other helpful sources of information about Marketing Cloud.
The Carousel contains links to these Marketing Cloud resources.
- Marketing Cloud system status
- Marketing Cloud release notes
- Trailhead
- Marketing Cloud video tour
- Marketing Cloud information on Salesforce Developer
The Metrics section can contain these details for the Marketing Cloud account. The apps provisioned in your account and your user permissions determine the information that shows here.
- Journeys – this graph shows the number and states of journeys in your account. Click View Details and view more details in Journey Builder.
- Automations – this graph shows the number and states of automations from the last seven days in your account. Click View Details and view more details in Automation Builder.
- Data Extensions – this number shows the total number of data extensions in your account. Click View Details and view more data extension information.
- Content – this number shows the total number of content pieces in your account, including a subtotal of shared assets. Click View Details and view more details in Content Builder.
- Users – this number shows the total number of users in your account. For business units, this number displays only the number of users assigned to that business unit. Click View Details and review all available users for the entire account.
SetUp Assistant
Use the Setup Assistant to configure your new Marketing Cloud account. A prioritized task list guides you to make full use of Marketing Cloud. Access Setup Assistant in the Setup menu of your Marketing Cloud account.
Setup Assistant helps you get set up.
- Enter essential Marketing Cloud information.
- Configure Marketing Cloud for your use.
- Implement the correct data structure for your needs.
- Create, send, and track your first email send.
Setup Assistant contains links to Trailhead, documentation, and webinar content to help you accomplish your tasks.
Account Settings
This workspace contains key information regarding your account and allows you to modify that information for you and your users.
SetUp -> Company Settings -> Account Settings ->
- Account Name
- Account ID
- Email Display Name
- Email Reply Address
- Portfolio Base URL
- Number of Active Users
- Time Zone
- Date Format
- Physical mailing address displayed in your emails
- Sender Authentication Domain
- Headers and Footers
- Tags
MID
The Member ID for the organization you’re logged in to. To find your MID, log in to Marketing Cloud and hover over your account name.
Security Settings
Marketing Cloud includes several settings to help you keep your account secure. There are several settings you can manage for all users of your Marketing Cloud tenant, including session timeout, requiring a secure connection, expiration for logging in, and much more. Here are some best practices recommended for your security settings:

IP Whitelisting
After you get your Marketing Cloud instance, use that information to determine what IP addresses you need to whitelist. The recommended best practice is to whitelist the entire set of IP ranges for your region. This practice ensures that Salesforce login pools can process your end users’ login authentication when accessing Salesforce anywhere and avoids any unintended service disruptions due to movement between primary and secondary instances.
Domain Whitelisting
Domain whitelist is intended to store domains to which you can perform redirects on form submission in Cloud Pages or in Smart Capture forms.
Identity Verification
The Identity Verification security setting in Marketing Cloud requires you to authenticate the browser or app used to access the application. When you attempt to log in, the system sends an email with a verification code to the email address associated with your account. Enter the code in the Verification Code field to log in. Ensure that all users in your account use valid email addresses in their user profile.
Export Email Whitelist
Your export email whitelist contains individual email addresses or domains that can receive exports via email from your Marketing Cloud account. Enter these email addresses or domains as export email recipients in the Setup section. Once you create an export email whitelist, only users matching the whitelisted criteria can receive exported data.
Audit Trail
Audit Trail allows security admin users to view Marketing Cloud access and activity records. Receive Audit Trail records either through Marketing Cloud Automation Studio data extracts or through REST API extracts. Retrieve Audit Trail information periodically for use in your own internal system tools. Audit Trail applies to all messaging and journeys customers.
Enable Audit Trail for any user with the Marketing Cloud Security Administrator role or the Audit Logging > Administer Audit Logging and API Access permission. To enable Audit Trail, in Setup, select Security | Security Settings, and check Enable Audit Logging Data Collection.
Basic Audit Trail is available to all Marketing Cloud customers via Automation Studio data extracts and API, and has a 30-day retention period.
For Advanced Audit Trail, contact your account executive. Advanced Audit Trail is available via Automation Studio data extracts and API, and has a 60-day retention period.
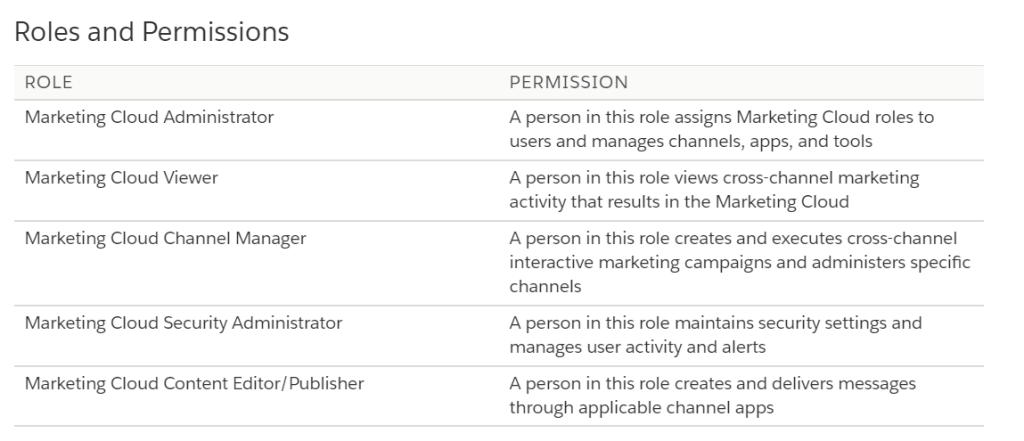
Roles
Marketing Cloud roles allow you to grant your users access to the areas and features that pertain to their job functions.
You can assign your users one of five standard roles as well as more specific permissions in your Marketing Cloud account. Each role includes a set of permissions that enable users to perform different tasks:
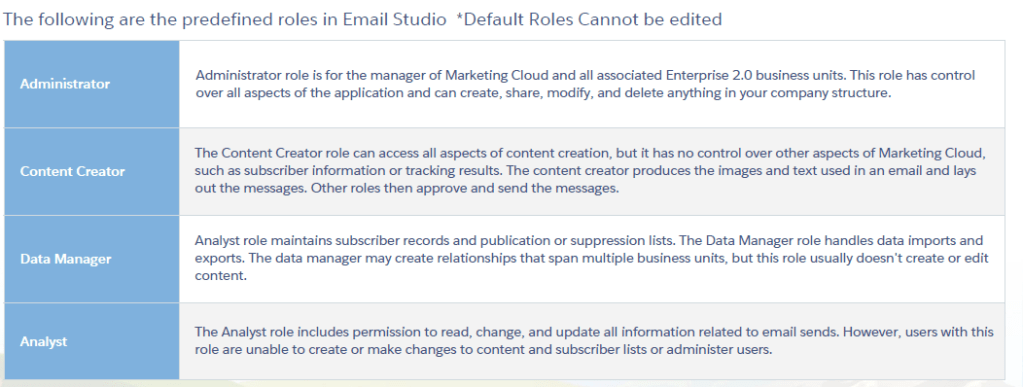
Email Studio Roles:
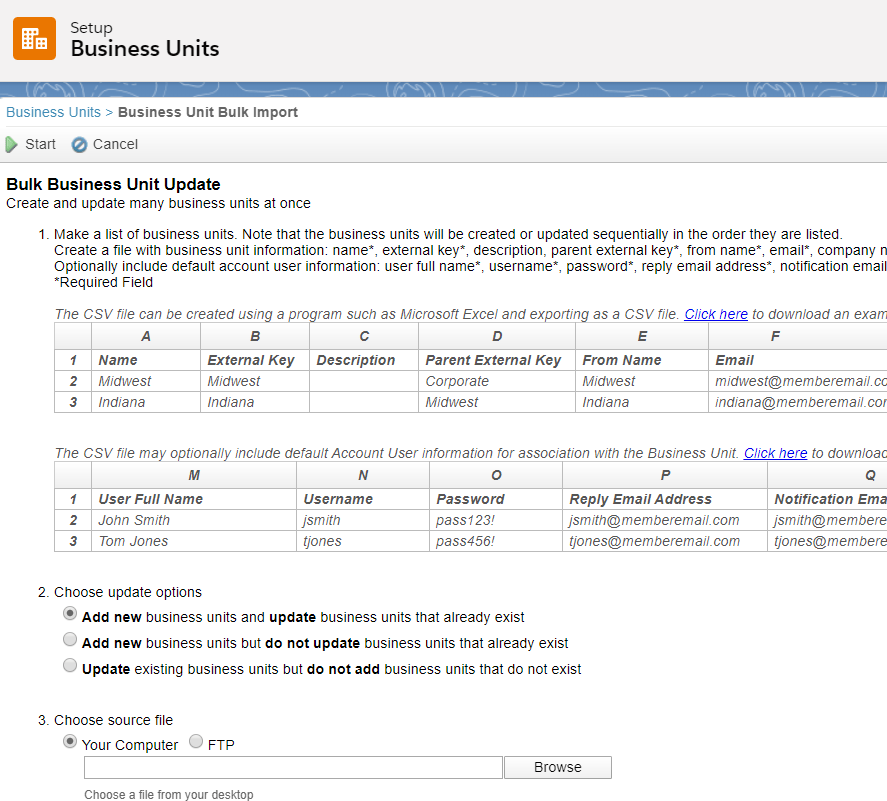
Business Units
Business units allow you to control access to information and sharing of information. Use the hierarchical structure of business units to control your brand while enabling access to messaging technologies to your users. Manage user roles for the business unit, view users who have access to the business unit, and define filter criteria for subscribers. Business units are available in Enterprise and Enterprise 2.0 accounts.
Business units can mirror workflow processes, demographic and behavioral data about your subscribers, or your organization’s operational structure. Users working in a business unit can access all items created in that business unit. Share items with users in other business units by placing the items in a shared items folder in the Content and Subscribers sections of the applications.
Grant business units access to features in Marketing Cloud. This role becomes the default role for all users in the business unit. Any role or permission explicitly assigned to the user overrides the permissions defined by the business unit role.
Import business units in bulk to save time.
FTP Account
Marketing Cloud allows up to three FTP users per MID. By default, the username is the MID number for your current Marketing Cloud MID, including the current parent account or child business unit.
FTP Site Information-> includes the URL and port number for your Marketing Cloud FTP account.
FTP Users -> includes information for all users associated: Username, password, status
Activity -> outlines changes to FTP accounts and when those changes took place.
Create an FTP Account : SetUp -> Administration -> Data Management -> FTP Accounts -> Add FTP User
File Locations
A file transfer location is an FTP site or other file storage location used to transfer files to or from your Marketing Cloud account.
Creating a safehouse location allows you to import decrypted files into the Salesforce Marketing Cloud without them being exposed in the Enhanced FTP Site Import directory. Only authenticated users can access safehouse locations, which reside on highly redundant, highly available central storage servers. Data retention policies default to retaining files for 21 days before deletion.
When you import an encrypted file with your safehouse location set as the default location, follow these steps to perform an encrypted file transfer:
- Import the encrypted file into the Marketing Cloud Enhanced FTP Import Directory.
- Use the File Transfer Activity to decrypt the file to the safehouse.
- Use the Import Activity to import the file from the safehouse.
Brand Builder
Use Marketing Cloud BrandBuilder to customize the color scheme in your Marketing Cloud account. Based on the colors of the logo you upload, BrandBuilder provides several pre-designed color schemes. After you choose how to privately label your account, BrandBuilder applies the color scheme to Marketing Cloud to give your users a branded experience.
Marketing Cloud Packages
A package is a container of functionality for something as small as an individual component or as large as a set of related apps. After creating a package, you can administer and distribute it to other users and business units within your account.
You can install packages into your Marketing Cloud account, and then configure and manage them. To view the packages installed in business units where you have permission to install and manage packages, go to Setup | Apps | Installed Packages.
Each package has one or more components that determine what the package can do. Use packages to create API integrations, install custom apps, or add custom Journey Builder components.
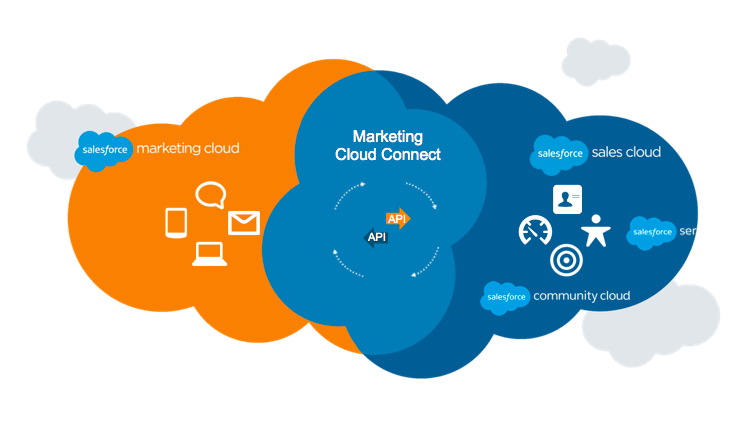
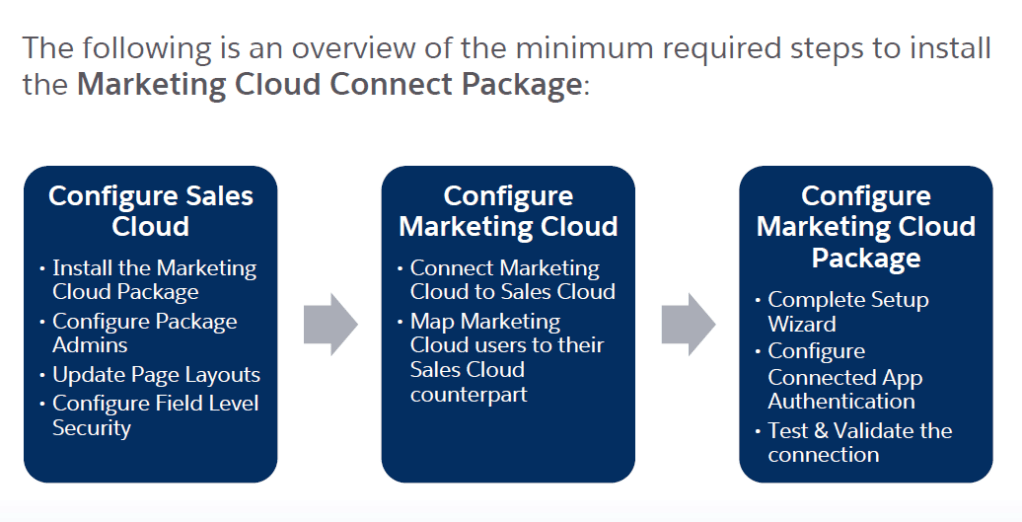
Marketing Cloud Connect
https://trailhead.salesforce.com/en/content/learn/modules/marketing-cloud-connect
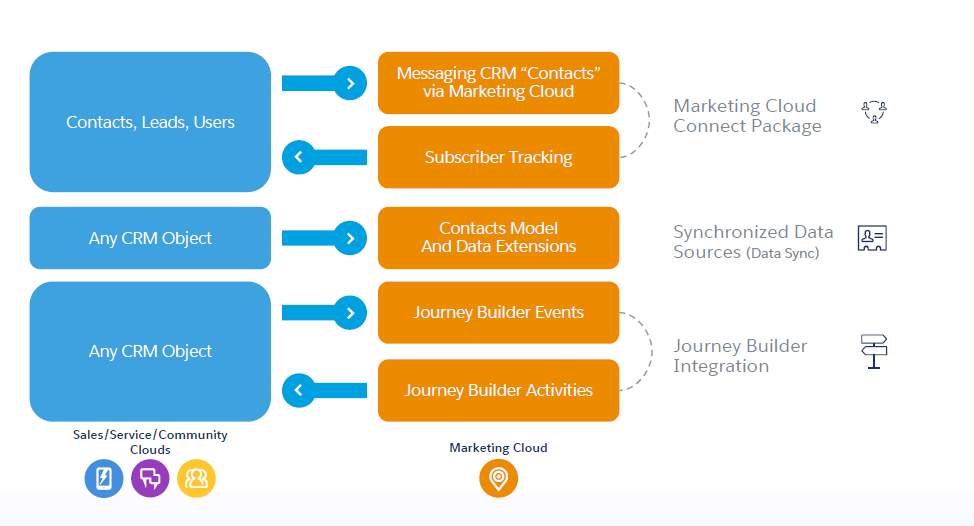
Marketing Cloud Connect integrates your Salesforce Marketing Cloud instance with Salesforce Sales, Service, and Community Clouds.
Benefits of Marketing Cloud Connect
- Send Email Using CRM Data: Combine the power of Email Studio with access to Salesforce reports and campaigns. That connection lets you easily target customers and personalize messages to them using all your CRM data directly in Marketing Cloud. Sales and service reps can send individual or bulk emails from Marketing Cloud, but within the app they’re most familiar with—Sales, Service, or Community Cloud. MC Connect also exposes all of the email tracking history on each recipient’s contact record in Sales or Service Cloud.
- Automatically Synchronize Data from CRM to Marketing Cloud: With Synchronized Data Sources, all theCRM standard and custom object data is available in Marketing Cloud, synchronized automatically.
- Connect Journey Builder with Sales, Service, and Community Cloud: Listen for events from Salesforce CRM—such as a new contact being created or a service case being closed—to launch customers into journeys and to trigger the initial email, SMS, or push message.Journey Builder can create or update records within Sales, Service, and Community Cloud as activities within a journey.
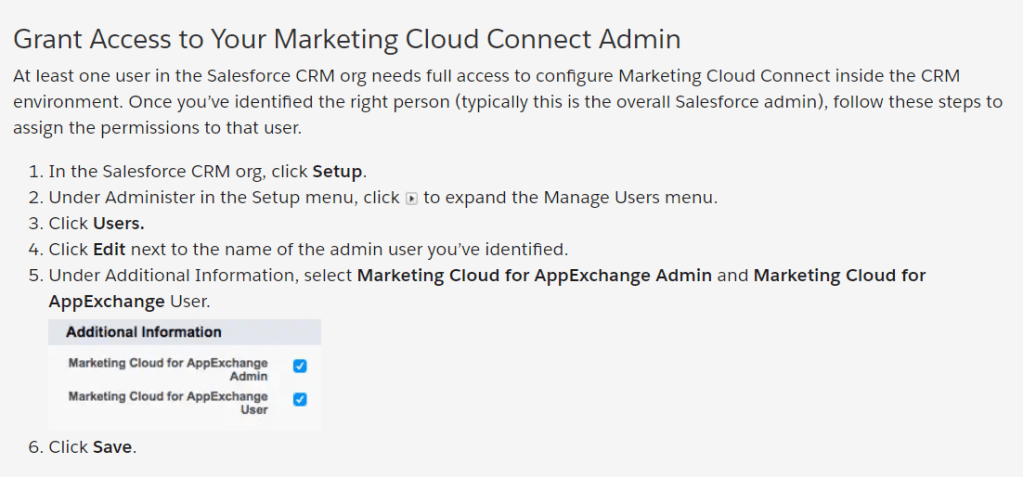
Grant Access to Marketing Cloud Connect Admin:

Sender Authentication Package
This collection of products for Marketing Cloud Email helps ensure that your email messages reach the inboxes of the intended recipients.
- Private Domain – This domain acts as the From address for your email sends. Salesforce Marketing Cloud authenticates your email sends using the Sender Policy Framework (SPF), Sender ID, and DomainKeys/DKIM authentication.
- Account Branding – Modifies link and image wrapping and removes all references to Marketing Cloud in favor of your authenticated domain.
- Dedicated IP Address – All email messages sent from your account via Marketing Cloud use this IP address. This IP address represents most of your sending reputation.
- Reply Mail Management – You can assign filters for out-of-office messages and manual unsubscribe requests.
Reply Mail Management
Reply Mail Management (RMM) manages replies to the email jobs you send through Marketing Cloud. RMM processes the reply automatically, if appropriate, and forwards the message if the message requires personal review.
Send Classification
Send classifications include these components:
- Delivery Profile
- Sender Profile
- CAN-SPAM (Controlling the Assault of Non-Solicited Pornography and Marketing) classification
https://help.salesforce.com/articleView?id=mc_es_send_classifications.htm&type=5
Distributed Marketing
Salesforce Distributed Marketing bridges the gap between corporate marketing, employees, channel partners, and your brand to deliver consistent experiences across corporate marketing and partner networks.
As a marketer with Distributed Marketing:
- Enable your teams to engage with their book of business at scale with on-brand content.
- Create moments of collaboration within email messages.
- Maintain brand and legal compliance with automated and manual approval processes.
As an advisor, partner, or dealer with Distributed Marketing:
- Send a quick email to individuals from their contact, lead, or person account record.
- Send an email to a segment of your book of business from a list view.
- Use a campaign to send multiple messages to a group of individuals without worrying about managing the touchpoint cadence.
Web Analytics Connector
https://help.salesforce.com/articleView?id=mc_wa_web_analytics_connector.htm
Use the connector to tag links in your emails by automatically including specific variables in the target URLs. The analytics tool then tracks those URLs back to the email.
Include any of these data levels in your links and track the results through the connector:
- Use account-level data to identify link activity as originating from your Marketing Cloud account, rather than another marketing channel
- Use email-level data, such as a campaign code, to identify link activity from email messages and track campaign effectiveness
- Use account-level data to identify activity from a specific subscriber. This data is applied to all links in each email so that website traffic is attributed to the subscriber who received the email.
- Use link-level data to identify links that are clicked in Marketing Cloud emails, which is helpful when using the same alias for multiple links.
Google Analytics 360
This integration enables you to track and analyze journey activity through your Google Analytics account without assistance from technical support or services.
UTM Parameters: The Google Analytics 360 integration with Marketing Cloud tracks certain UTM parameters. The UTM parameters, which are appended to the URL, identifies the marketing campaign that refers traffic to your website.
Additional Resources:
Links to other topics:

You made a typo error on
Use account-level data to identify activity from a specific subscriber. This data is applied to all links in each email so that website traffic is attributed to the subscriber who received the email.
it is located at https://jbitra.com/2020/05/25/marketing-cloud-administrator-certification-study-guide-part-3-setup/
It should be Subscriber-Level Data.
LikeLike
Thank you so much for compiling this information Jyothsna. I was just confused about the BU availability in different tenants. In this trailhead https://trailhead.salesforce.com/content/learn/modules/marketing-cloud-setup/manage-business-units, it is mentioned that “Business units are not available in Enterprise 1.0, Agency, or Core tenants” and are available in “Enterprise 2.0 tenant” but in your blog you have mentioned that “Business units are available in Enterprise and Enterprise 2.0 accounts” Can you please clarify this ? Thank you
LikeLike